X2WorkFlow How Tos
Start a Flow
The first thing to do in starting a new flow is to get to the flow editor.
X2Flow is a feature of the Marketing module in X2CRM. Once you’ve navigated to that module, select X2Flow from the left hand side panel. Once you’ve clicked that option you are now in the X2Flow campaign overview screen. From there you can click on Create Flow and begin the process of creating your own new customized marketing automation.


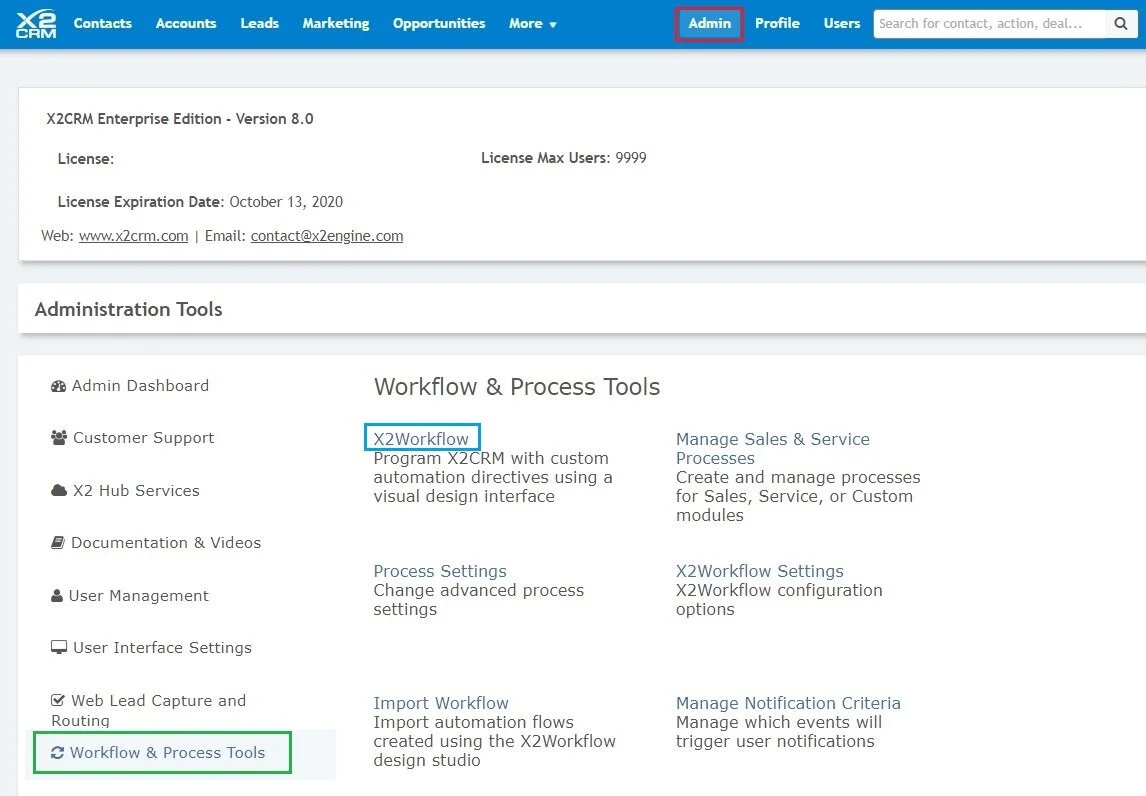
Alternately, you can get to X2Flow through the Admin menus. Select Admin from the header menu. Once on the Administration Tools page, select Workflow & Process Tools from the left hand side of the page. Then select X2Workflow to gain access to the X2Workflow Automation Rules page. From this page, you can Manage Workflows, Create, and Import Workflows.

Select a Flow Trigger
Starting on the X2Workflow Automation Rules page, select Create Workflow from the left hand column ‘Actions’ menu. The Create Workflow dialog will provide you the fields needed to create a new workflow.


An X2Flow is triggered by a certain event in X2CRM. These events can be as varied as a new web lead coming in, a contact tag being added or removed, or a contact clicking on a marketing campaign email. The full list of X2WorkFlow triggers is located here within this document.
The types of flow actions that are available to you are dependent on the flow trigger you select. For example, you may only select the Push Web Content flow action if you have selected the Targeted Content Requested trigger.
Additionally, the types of dynamic variable attributes that you can select are dependent on the type of flow trigger you select. Each flow trigger is associated with a certain module type. X2Modules are discussed at length in the X2CRM User Reference Guide. For example, if you select the Contact Web Activity trigger, the attributes you will be referencing will be associated with the Contacts module. If you select the Action Overdue trigger, the attributes you will referencing will be associated with the Actions module.
Combine Flow Actions

The most interesting part of X2Flow is the ability to create customized sequences of marketing automation. This is where combining your flow actions comes in. Each flow action allows you to introduce some type of automated behavior in X2CRM. For example, the Add Tag flow allows you to automatically add a tag of a certain type to the record page.
To add a flow action to your current flow simply drag and drop it into the flow editor window. Nearly all of the actions have data fields and attributes that can be modified to tailor the flow even further.
The conditional Switch allows you to create a decision fork in the flow if a certain attribute value has been met.
Use Formulas in X2Flow

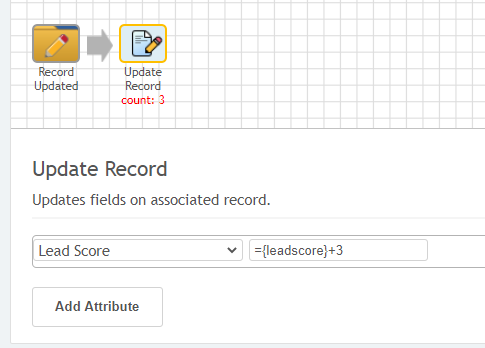
X2Flow offers an enormous degree of automation power and allows creative uses of the attribute fields in X2CRM. At certain points, you may want to include an equation which can operate over data fields, modifying them incrementally or via some mathematical function. In X2Flow, you can use formulaic equations to achieve this.
In X2CRM, formulas are introduced with an equals sign (=) at the start of the equation. You can use the attributes in various modules as variables in your equation. The formulaic equation feature is a powerful tool in X2Flow, however, we advise that it be used only with numerical data fields. Thus, we recommend that if you wish to use formulas to update a lead score, for instance, then we recommend that you first convert the field to a numerical field type first, in the X2Studio field manager. Then, you can use the formula like the following: = + 1
View Flow Examples
Complex workflows with branching logic can be created. These workflows can create notifications that send a message to an X2 user, creates and send a custom email to an associated contact record, and follow different workflow paths based on specified conditions. These workflows can be customized to fit your workflows and operating procedures.
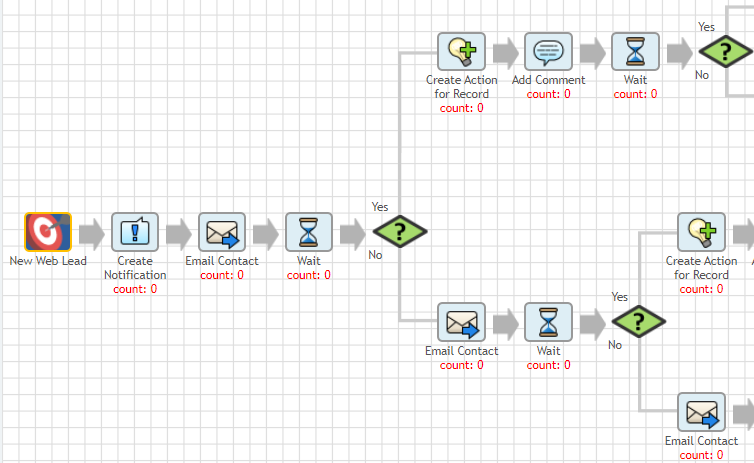
There are a more example flows illustrated on the X2 Workflow page.
Not finding the answers you need? Just fill out the following form and we will contact you!