X2Marketing
The Marketing Module in X2CRM is a powerful set of tools for both outbound and inbound marketing, disseminating sales offers, and automating responses to leads. The X2CRM Marketing Module is a full-fledged Marketing Automation system. Used in conjunction with the complete X2CRM application it provides unparalleled capabilities but the Marketing Automation can also stand alone and interface with other CRM systems to provide a marketing automation system for them.
This section will describe how to use each piece of the Marketing module and also provide an overview of best practices of how to successfully launch email campaigns from importing data, creating a segmented list, create the campaign launch the campaign, and monitor the results.
Click here for an additional overview of the X2CRM Marketing Module.
The X2CRM Marketing Automation (MA) system provides multiple ways to create and deliver email campaigns. There is the single email blast Campaign, a Long-Term Campaign, and a Drip Campaign, which is performed using X2WorkFlow. The single email blast campaign is designed to send a single email to a segmented list. This is the first step in a Campaign, determining who you are going to send an email. Once you have created the list you can Create the Campaign. Lists can be created from either Contacts, Accounts, Leads, or Opportunities. Once you create a list in one of these modules, you will see it show up in the drop down upon creating a Campaign. Please note, you may want to name you list with the module it points to in the name, ie. Contacts – Reseller list, Accounts – Customers, Leads – New Web Leads, Opportunities – Current Opportunities. This way, you know at a glance where the data in the list is coming from.
When the user clicks on the Marketing Module, the grid view that comes up shows all the existing Campaigns in the system. The list view displays a catalog of All Campaigns. This is an overview of the current and past marketing promotions you’ve constructed in X2CRM. Click an existing campaign to View information about it, including name, description and campaign status (i.e. whether it is active, complete, public visibility and its assigned users). Update or Delete existing campaigns by selecting the appropriate actions from the left-hand column.
Click on Create Campaign in the left hand menu to start the process.

Start by giving the Campaign a name.
Next choose the List you want to email to via the drop down menu under List.
You may choose to apply a Suppression List to your campaign list. Any email on a Suppression list which is also on the campaign list will not be emailed to. You may choose multiple Suppression lists.
Choose the email template you wish to use for the campaign. Choose Custom if you are going to enter your own message for the campaign rather than a template. You may save a Custom message for future use by saving as a template.
You may add a description of the Campaign if you choose.
·The Type should be Email
Category allows you to assign a category to the Campaign. This is used in the ability of the recipient to unsubscribe from just a specific Category or from all emails.
Choose what email address that the Campaign will be sent from. This can be a 3rd party email service.
Choose what user should be assigned to the Campaign.
Enable Redirect Links is important if you have any links within an email and you want to be able to track whether the link is clicked by the recipient. By checking this box, X2 will track the clicks.
Choose Visibility within X2 users as to Public or Private. If Private, only the Assigned To user will see the Campaign.
Launch Date – you may choose a date in the future when the Campaign will be sent or, if you leave this blank, you can launch it yourself.
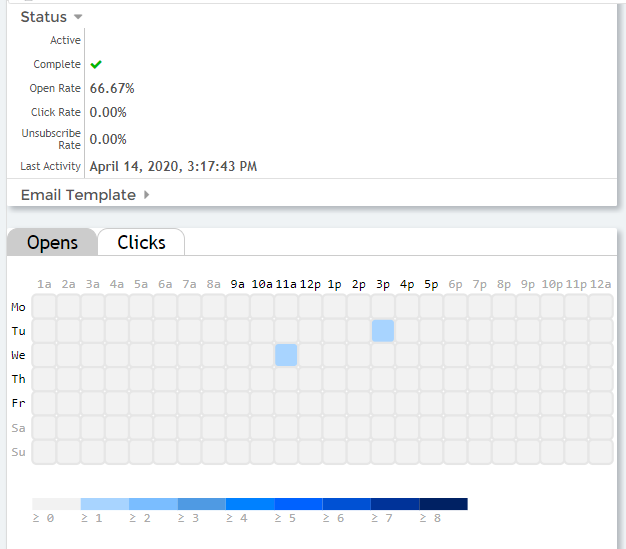
The next section provides different statistics on the Campaign after it has been sent as you can see below. It provides status of Open rate, Click rate, Unsubscribe rate, and Last Activity. Below that is a Heat Map showing when emails were opened and when clicked in a graphic form.
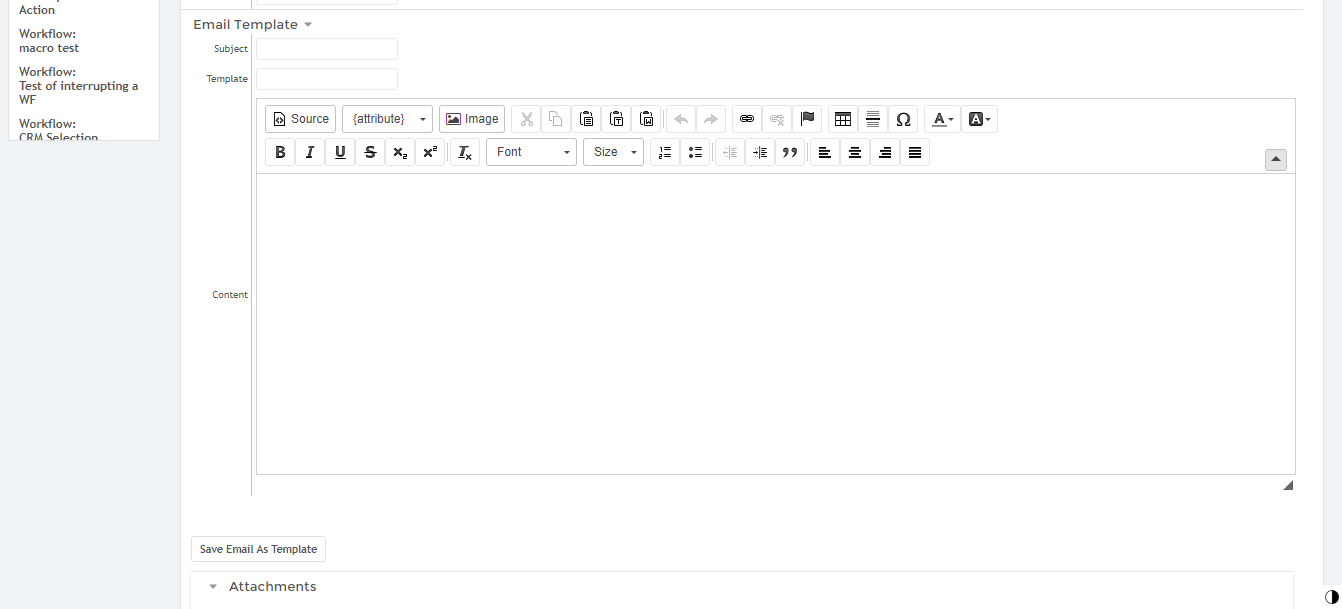
The above section shows the Email template that you chose previously or allows you to enter the email message you choose.
You may add attachments which will be included along with the email.
The next step is to click on Create (just below what the image shows) and X2 will create the Campaign.

If you did not specify a Launch Date, you will see the Launch Now button along with a Send Test Email button. You can send a test email and a popup window will appear to allow you to do that. Once you are satisfied with the Campaign, click on Launch Now and the system will process the Campaign and send the emails. The system will show you the progress along the way until all have been delivered.
The system will show you the list of email recipients and whether each Opened, Clicked, and Unsubscribed. Over the next few days this will be updated as the recipient reacts to your email.

In addition, you will see statistics of what has gone on in your campaign. This will continue to re-calculate as the days go on.
Long Term Campaigns operate the same way as single campaigns except that it allows you to set up a series of emails to go out to the same list over time.

Start the same way as before, but providing a name for the Campaign, specify the List to use, and add any Suppression Lists. Next specify how many emails will be in the Campaign and click on Create.
In this example we have chosen four. Notice you can specify the Send As for each, choose a Template for each email, and then choose the actual Launch Date. Once these are created you will see them listed in the All Campaign list.

There is an entry for each instance of the Long-Term Campaign plus and overall master view.


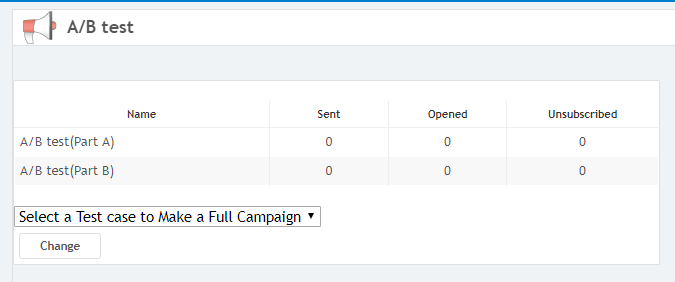
X2CRM allows you to test your email messages before launching large campaigns. A/B testing allows you to send two different messages out to a segment of your overall list. You may then monitor the statistics and determine which message to use for the rest of the email list.

As with the regular Campaign, give the Campaign a name. Choose the list to send to and then tell the system what size sample you want to test. You then choose the two different templates to test and when you want to send.
If you choose Create without entering a specific date, the system will create the two campaigns, A and B, and allow you to launch when you want. If you choose a date, it will run the campaigns at those times. The system will randomly choose the number of the sample size to run each test.

You will see the two different tests and the overall campaign. Once the tests are run it will display the statistics. From within the main Campaign you can then choose which message to use to complete the Campaign.
To learn about Contact Lists click here, https://x2crm.com/reference-guide/x2crm-contacts#lists
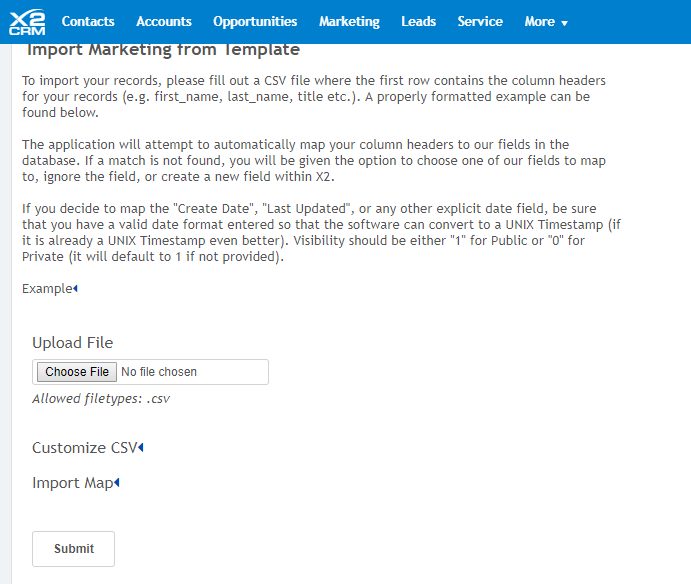
This feature allows you to import a CSV file to be used in a Campaign.
This allows you to export a CSV file from an existing list.

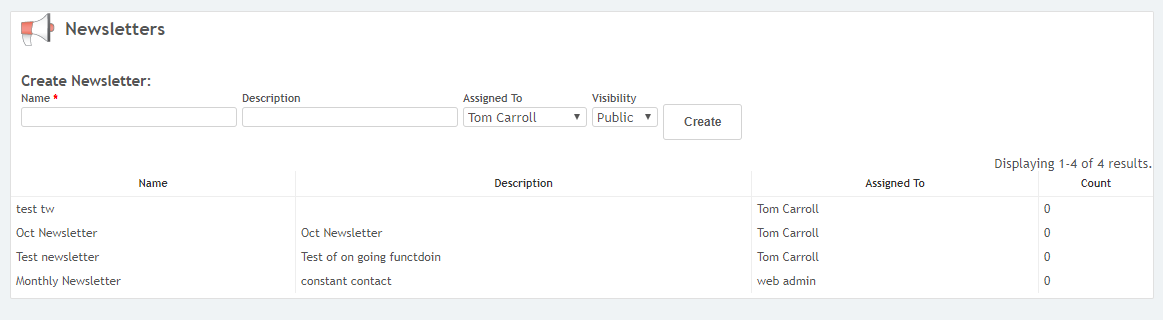
A newsletter is a type of campaign, but it is mainly a type of list. Selecting newsletters from the left column menu brings you to an overview of all newsletter recipient lists.
To create a new newsletter list, select the ‘Newsletters’ option from the left hand dataframe of the Campaigns page. Enter a name for the list and a brief description of it. Assign an owner and set its public visibility. When you initially create the newsletter recipient list it will be empty. You can use preexisting Contact Lists to populate a newsletter list.
When you click on a newsletter list name, the screen to the right comes up.
This web form is a signup sheet. People who add their email addresses in the form will automatically be added to the list of recipients for that newsletter. This list of people is editable and updatable.
Just like X2CRM’s web lead forms, the newsletter’s web form embed code is automatically generated. Copy and paste that code into your website to include the email signup form on any of your webpages.
You may edit the form’s appearance to integrate it with the theme of your site. Options to change text and background colors, font, and borders are all available.
When the list begins to populate, the recipient list, highlighted in the blue box near the top of the page, will display a list of everyone who will receive the newsletter. Additionally, it will show those who were signed up for the newsletter but who have subsequently unsubscribed.
To create the content of your next newsletter click the “email entire list” button, highlighted in the red box near the top of the page.
When you click “email entire list” and thereby create a new instance of a newsletter, you are taken to the create a campaign screen. You must enter a name for the specific newsletter and you may enter a description. The email contact list, highlighted in the blue box, defaults to the newsletter contact list that you have created and that people have signed up for. However, you can also select an alternate contact list by typing its name into the data form. See the contact list section for more information on lists.
Create the email template that will be sent out to the contact list. You can include dynamic variables like or which will be automatically replaced with the appropriate value based on the contact’s information.
Click the green create button to finalize the template. After you’ve created the newsletter you can include attachments and images. Then you can launch the campaign and witness real time who has received it, opened it, and/or unsubscribed.
X2CRM allows you to easily create a Web Lead Form, giving you customized online questionnaires and information sheets for your customers to fill out on your website.
The red box highlights the visual modification system to customize the form. Simply drag and drop field items from the field list to the form column. You can sort and rearrange the form options with simple mouse dragging. Set whether the field is required and specify its placement in the form. Preview the form and visually make sure its up to your standards.
The appearance settings, highlighted in green, provides you the visual customizations necessary to integrate a streamlined web form into the theme of your site, such as CSS, HTML, and header & footer code.
You can also automatically add tags that will become associated with all the leads created via the web form.
Shown in the blue box, you may also quickly name and save the form template for further future customization and usage within different contexts. For example, you can use a form template for web leads, service cases, or newsletters. You can use the template as is or further customize it.
When a web lead comes in, you can automatically send them an email response thanking them for their interest and offering them a follow-up. Additionally, when a web lead comes in, your sales team will want to know about it. You can choose whether the sales rep that web leads are assigned to will receive an email or not. Highlighted in the orange box, you can select from the drop down email template menus.
Finally, grab the embed code, shown in the purple box, to copy and paste it into your website.
The web tracker allows you to keep track of contacts on your site. An announcement will be made within your X2CRM activity feed whenever a contact visits your page.
Set the parameters, highlighted in green, to enable or disable the tracker, and to set the cooldown period – i.e. how long after the first visit to disregard further clicks on your site.
Take the HTML code, highlighted in red, and paste it into the body section of your website’s pages.
Anonymous Contacts & X2Identity Fingerprints
X2Identity uses browser fingerprinting as an alternative method to the traditional web tracker. Browser fingerprinting is not reliant on cookies and instead identifies a contact based on certain browser attributes that make them unique. If browser fingerprinting is enabled, the tracker will attempt to identify a contact based on their browser settings.
You can set the threshold for the minimum number of attributes that must be equal in order to constitute a partial match, highlighted in the blue box in the previous image. It is recommended to keep higher values to prevent false positives. You can also tune the maximum number of anonymous contacts and actions associated with them in order to limit flooding to the database. The fingerprint tracker will obey the same cooldown period as the web tracker.
Anonymous contacts are created upon submission of the newsletter form, or when a user who has not yet been associated with a fingerprint visits a page embedded with the web tracker. Once these anonymous contacts submit the web lead form, their lead score and activity history will be migrated over to an ordinary contact record.
The Landing Page Designer allows you to easily create landing pages for your web marketing campaigns. Simply drag and drop different elements, such as images, headers, and web lead forms, onto the grid to design the page to make it look however you would like.
By creating landing pages within X2CRM, you’ll be able to fully utilize all of X2CRM’s tracking capability and analytics directly within your page.
Not finding the answers you need or want more information? Just fill out the form and we will contact you!